Google Translator

Recommended Links

Showing posts with label SpringFling Garage. Show all posts

Thursday, June 24, 2010

SpringFling Garage....contest closed


It's finally been announced and if you click on the link, you can see all 44 entries & the reason why the judges took 9 extra days to make their decision. Sure is some super talent out there!!
Everyone who entered will get a quarter scale version of the Baslow Ranch! Not bad for having fun...

Friday, June 11, 2010

SpringFling Garage....Finished?????

I'll start with the easiest first ....and that's the boat house:
I used twigs to build up the moorings and the posts; Ken is forever cleaning up our beach ...just amazing just how much driftwood we find. Well, for once it came in handy!
I wanted my walls to reflect the age and condition of the house, so I chose a "broken plaster" look using air drying paper clay. My clay was at least a year old, not exactly dry but ...close to it. I used a marble rolling pin to roll it out, just like cookie dough. Since I tried to keep the clay thin, it was sometimes difficult not to have it tear, lifting it off the tile. Brushing the underside of the clay with a watered down white glue makes it adhere to the plywood walls which I'd gessoed to avoid warping. You have to be careful about air bubbles but other than that, this is such an easy and quick way to finish walls.
Add a little water to your finger to smooth any joints; I purposely allowed the torn edges to form gaps so I could imitate broken plaster. Unlike most people, I covered my walls first with the clay and added the "lathe" after. Before the invention of drywall, builders would nail small strips of wood called lathe between the wall studdings and then cover them with plaster. Hence the term "plaster and lathe" ...which I'm sure you've heard of.
Our one furniture making company in town has a bin out front that they regularly fill with scraps of wood. Free for the taking! Most of the wood is of varying thicknesses and roughness. There are usually lots of veneer thin strips and that's what I used for my lathe and my floor boards.
The dresser is something I found in my stash; it had originally been stained a rich maple then overlaid with a RL size crackle effect. I'm not sure where I got it but it looked so fake! Nothing that a little bit of scrapping and sanding couldn't fix. Two "freshly caught" fish and 2 fish fillets on a plate sit on the dresser; the heads and fins are on the newspaper laying on the floor and yes, there's also a few cans rolling around.
The stove is a Chrysnbon kit with some missing parts that should have been thrown away long ago. Since the lost pieces were black, I merely cut some black foam to fit. Hard to tell the difference, even close up.
There's a rusted enamel frying pan with melting fimo butter on top of the stove.
Almost 2 weeks ago I managed to win a wooden row boat and a metal diving helmet on eBay UK. They arrived in the nick of time!
It was all finished, photographed and my entry sent to miniatures.com on Thursday!
I wasn't going to do this post until I could give a link to my entry and ask all of you to vote for me but apparently the people in charge of the website are too busy. They did however assure me that they'd "get around to it when time permitted".
So instead I'm going to pretend that I'd actually won the Facebook competition ....because that's how I feel!
All your comments have kept me going, when I felt I like quitting.
Dale sent me some lovely archival fish pictures, which I didn't get to use.
Doreen mentioned that she wasn't going to vote until she saw my entry.
I could go on and on. So thank you! I feel like such a winner and it's all due to you guys!


I'm going to take a few days of well earned rest. Ken's off to Edmonton for a couple of weeks, so I thought I'd do some cross border mini shopping just to see what they have that we don't. And while I'm in the area I'll visit the dollhouse museum in Fort Erie. I promise to take my camera; hopefully they'll let me take photos.

Saturday, June 5, 2010

SpringFling Garage....interior


Well my month is rapidly passing by... it's filled with lots of barbecue parties and visits. So there's no time to lose getting the insides finished. As you can see, I'll be starting from scratch. There's nothing inside. If I'd had a plan of what this was to be, I would have glued the buildings directly onto the foamcore foundation. As it is, I'll have a lot of finishing to do to make it look presentable
In the house, the curtains and the rod are removable. I'd like to have the interior match the rough and aged exterior; after several days of worrying about it, I've come up with an idea: peeling wallpaper with the boards (or plaster and lathe) showing through and cracked plaster!
But there's no way I am going to stick my head inside and still be able to do a good job; I therefore have 2 choices: air drying clay rolled out paper thin, or I can go with pasting paper towels/toilet paper directly onto the walls; it's a great technique ...very realistic looking when you want to display old plaster.

As for interior accessories, I thought: fishing net, lobster trap, old fashioned life jacket, creel basket, bobbers, ...and of course, fish & a table to display them on!
Don't think I haven't been busy so far. My fimo fish've just finished baking.
Since they're supposed to be rainbow trout, they still need speckles and eyes dotted on and a newspaper underneath them to catch the mess.
I've also made the lid for a creel basket but made the opening the wrong way around so I need to do it over again.
No idle hands here to become the devils tools....

Monday, May 31, 2010

SpringFling Garage....Finished!

Late Wednesday evening, I felt like I'd just finished creating the world! ...totally exhilarated and exhausted at the same time ...especially considering that it took a lot longer than six days, more like over a month. So just to recap:
The top shows what the kit looks like with the additional building...and my thought process of turning this into a 20s garage is pictured below it.
Chelle told me, I should have known better since I live on the shores of a lake and should have immediately thought: fish hut/boathouse. But you know how it is when you get an idea in your head. After I started building and looked at it, it just cried out to be a run-down, old-time shack by the water with an attached boathouse.
Weathered wood was created using spackling, wire brushed and stained with an ink/alcohol mixture. After that I did some drybrushing to achieve a really old wood look that's been in the wet a little too long.The building was raised up using foamcore to allow "water" and "waves" to flow underneath the dock and into the boathouse. Both sides of the buildings are foamcore carved into "stone" and "rocks", painted, planted and the remainder covered with beach sand from our lake. The waterside reeds are bristles from a Dollar Store broom.I had more trouble with that darn water! Having added acrylic paint to my resin, I discovered that the two would NOT mix; of course being cheap & not wanting to waste the last of the resin mixture, I spooned it on, only to discover that you can make fantastic looking, flowing waves that way. I just wasn't able to "swish" my resin until it hardened into waves...maybe next time! Surf and wave caps are saran wrap covered in resin.
I worked outside; Easy Cast resin takes a long time to harden and until it does, it becomes tacky all over again in the sun and the heat! At one point, while holding down a portion of the roof, I accidentally set my elbow down & pulled up a portion of the resin....
The roof is corrugated cardboard that was gessoed and painted to resemble an old tin roof. The chimney pipe is the cardboard portion of a heavy duty wire coat hanger, covered with the foil from a coffee can seal. Some of the wire became the sign hanger and the light fixture pipe above the boathouse door.The only things not made by me are the flowers in the window, the barrel and the wooden pail. In the pail are tiny clams that I beachcombed from our
lake.
The 3 seagulls are thanks to an idea given to me by Leslie from About.com; the fishing rod is thanks to an idea from Doreen Playter.
The worms in the can, the sign, seagulls and the light fixture incl
lightbulb are fimo clay.
I must have taken a million photos.... It ended up as an all day process: shoot a bunch of photos; download to the laptop; look at them; discover something I didn't like about each one; go back outside & start the process all over again. I wish I had a camera that showed white objects and dark objects equally well in one photo! Of course it didn't help that most of the day was "ueber"bright.
The next issue was the contest entry email with the 3 photos. I held my finger over the send button so often; chickened out, sent it to myself, made sure that everything was OK, put Greenleaf's email address back.....
But you don't want know all that; you want to see the finished Fish Hut, right?

Wish me luck! The Greenleaf contest asked for 3 only! photos and is based on
originality. In addition a 2nd contest from miniatures.com piggybacks onto this one but doesn't close until July 4th. So that'll give me time to finish the insides and then enter again.

Wednesday, May 26, 2010

SpringFling Garage....counting down

As my dad used to say: "Morgenstunde hat Gold im Munde" which roughly translated means it's worth getting up early....if only so you can see the world like this:
When I was little, I'd pretend to be the only person around & I'd be off to explore new worlds and frontiers. Now that I'm older...but still not grown up LOL, the only thing I'm off to do is a bit of garden weeding before it gets too warm, then it's back to the "Fish Hut", which is what I've decided it'll be called. Here's a progress report...but no pics yet, sorry: I've opened a can of worms so guess I'll be making a fishing rod next.
My cut off date is Friday. See you then with photos....

Monday, May 24, 2010

SpringFling Garage....et al


The building is finished....sort of.
I've had to redo the water and in the process hid the lovely colors that you all liked so much. Unfortunately every time I took the house outside to work on it, the epoxy softened; at one point while holding down a portion of the roof, I set my elbow down and loosened a small portion.
It seems that everyone else is building with a secrecy equivalent of MI5 or the CIA. All this has given me a dread of showing any more photos. ....not that I think I stand a chance of winning. I've made this kit just a little too dark and different.
This week I'll finish staging it. This is something that all real estate agents and house sellers know about: staging is that little something that makes a house "pop" and turns it into a saleable one!
Oh...and if you noticed that dinky little chimney pipe sticking up out of the roof... it's been replaced. If you've ever seen any old style pipes, you know they were all small but the one you're seeing really was out of proportion.

So instead of my kit, I'll show you the first photo I've received from my friend Chelle over in England who's busily creating another commissioned local pub Take about creative! Way a go Chelle. Hopefully I'll get more "piccies" as she progresses ...hint hint!

In local news...., we are the proud(!) possessors of our very own internet tower. Out here in the boonies, we have limited choice of internet. It's either dial up (yuk!), satellite or private provider. So for an exorbitant monthly amount we went private last year. This week our provider asked if we'd like free internet service in exchange of allowing a tower to be placed on our property. Need I say how high we jumped at the offer LOL!!

In Canada, May 24th is a long standing holiday that used to celebrate Queen Victoria's birthday. Many years ago when we started distancing ourselves from Great Britain, this traditional May long weekend became colloquially known as May Two-Four. In Ontario a Two-Four is another colloquialism for a beer carton containing 24 bottles.
Our May long weekend has become the first of the summer parties. We finally have warm weather; local beaches are full; local police are busy pouring out any filled beer bottles that they come across...and there are lots (This country is still puritanical enough not to allow drinking off-license) and tonight the skies will be filled with fireworks galore.

Thasssss all folks; have a great week and see you on Friday when I'll show you my staged ...and ready to "sell"...boathouse. BTW that's a dragonfly hovering above Jeff's head.

Monday, May 10, 2010

SpringFling Garage....Day 6

I'm really pleased with how the water & the waves look but the spray hitting the dock supports flattened out when I wasn't looking. I may go over it again. Only this time, I'll try pouring a thin layer of resin onto the saran wrap & position it after it's hard.
I added some plants & grasses.

....onward and upward! The roof gets started tomorrow.

Friday, May 7, 2010

SpringFling Garage....Day 4 & 5

When I was doing the faux painting technique workshop in Ottawa, the lady working next to me kept worryng that we were wasting so much paint and the rest of us would tell her that it was only paint from the Dollar Store. I guess we all have fears about trying something new in case we waste material or money!
I've been putting off carving rocks....in case I couldn't make any that looked realistic but the amount of builders foam that I used on either side of my Bait N Tackle shop & adjoining boathouse really wasn't a lot....worth maybe 75cents, if that.
What you're seeing is the first attempt & I'm quite pleased with it. The right side needs some more contrasting washes and both sides need scenic scatter along each side of the buildings.


I also need to buy some glue that won't "eat" the foam; not all glues are created equal. LOL
It seems wood glue does not hold the foam together & I've sort of patched pieces to fit around the side of the dock. I also need to hide the pink foam at the back. That's the nice thing about photos; they always show you your mistakes...whether you want to see them or not.
As you can see I've built a "concrete foundation" under both buildings, otherwise the boathouse doors would have dragged in the water.

I'm off to spend the weekend with my mom. Monday, I'll start on the roof. I also need to create an ocean with whitecaps splashing in front. That's something else I've never tried before...
To paraphrase the Star Trek series:
"Go boldly where you've never gone before ...and to hell with the cost!"

Wednesday, April 21, 2010

SpringFling Garage....Day 3

With the lovely spring weather I like to work outside. I can be as messy as I want which is a good thing since weathering wood can be extremely messy. ....at least the way I do it!
All you need is a mixture of india ink and rubbing alcohol. Since I'd never tried this before, I wasn't sure what the proportions should be. The first coat seemed slightly purple-y & I wondered if maybe I'd gotten the wrong type of ink.
I tried mixing tempera and water but that didn't seem to mix well so I dumped that out & used black acrylic paint with water. Here's what it looked like:
Not bad but too light I thought. I never could wait! So I gave it a second coat of wash. And then for good measure I dabbed on the remains of my wash where I thought the wood might have weathered more than in other spots.
Then I thought OMG, I've ruined it. It's too dark! But once it dried properly, it seemed OK:

Certainly much better than the porch floor boards. They don't look realistic at all. What do you think?
I'll still have to daub on some hints of brown & green but I'll leave that until after my workshop this weekend. One and a half days of learning faux painting techniques. I am so looking forward to it!! Maybe I can even learn to do paint with "subtlety". LOL

In case you're interested in what else have been keeping me busy....
This was before:
This is after:
I didn't paint this one; just repaired it. But I have two more Muskoka chairs waiting for me in the garage....still in the box; not even primed. And I know exactly what type of scene to paint on them!

Saturday, April 17, 2010

SpringFling Garage....Day 2


Have you ever noticed how projects seem to take on a life of their own and even start dictating how to proceed?


From the time I plunked my money down to buy this kit, I knew exactly what I was going to do with it! With the help of Photoshop, I could even see what it would look like.
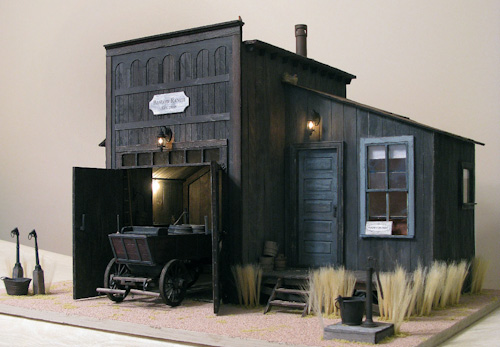
...a run down, abandoned garage ex-livery left behind during the depression: time weary and weathered! I had all kinds of visual aids, from a painting to the real thing I was going to turn the kit around in order to have one large wall where I could display old signs... ....had all these great photos from the "Dirty 30s" depression that I could tease you with

All for not!

I got as far as painting it black and adding the spackling, preparatory to creating weathered wood boarding.

As soon as I put the store and the garage together and then added that porch, I knew exactly! what it looked like. And it was the furthest thing from a 30s garage.
Oh, I can still use the weathered wood exterior! But all I see is a bait & tackle shop attached to a boat house.

Wednesday, April 14, 2010

SpringFling Garage....Day 1

Here's what Greenleaf gave us to play with:
I'm not going to divulge what look I'm aiming for as I assemble this garage. Suffice it to say that from the time I was very small, my mother told me I was contrary. It either had to be my way, or I'd refuse to play. Apparently contrarian and contrarism are real words. In the sixies they'd be called "free to be me" people.

Being contrary means you have to be very careful when you pick which parts of the garage go where. I want my garage exterior to appear to be weathered wood and because the "boards" will not fit tightly together, I needed to paint the walls black. On hand I had black tempera & black acrylic paints. Which to use? Can't get the plywood too wet in case it warps. So I decided to mix my two blacks.
Imagine my amazement when they reacted & gave me a thick oozy gel. I've googled to try & figure out why, but am still at a loss. My garage parts, however, are a lovely evenly opaque black....just perfect for what I want.

Hint: