CDHM is having a Halloween contest:
CHALLENGE
→ Create a miniature that you feel represents Halloween.
→ It can be anything you want, as long as it relates to the Halloween theme in 1:12 scale or smaller.
→ Entries must be 3-dimensional and created for this challenge.
Remember those rotten apples that I made?

This is where I used them.
 I put them in a wash tub made of petrified wood with a snake aka garden hose filling the tub to overflowing and then some.
 My entry is entitled: "Hello dearies. Have an apple"
I thought you might like to make your own faux wood; so here's how:
Normally you'd use equal amounts of polymer clay in 4 shades of browns, say: chocolate, caramel, ocher/beige and white (or off white). I'm going to use black, dark green, grey and white.
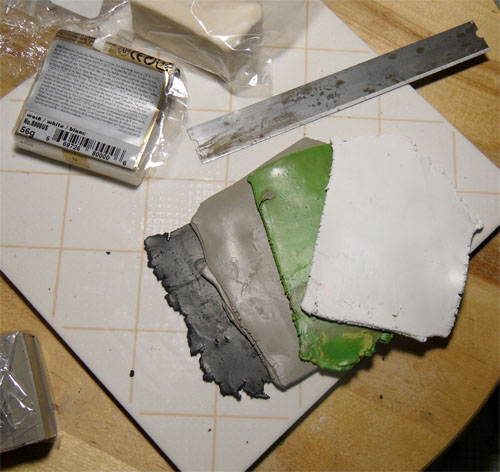 Condition your clays. You can do this by running it through your pasta machine if working it by hand is too hard.
NOTE: always condition from lightest to darkest or clean your machine in between colors. And clean your hands between colors as well.You want your machine set for the thickest level and stack them in the order showing in the first photo.
Cut your stack into a rectangle. Roll your off-cuts into a pencil thickness; you'll be using it to make knots in your wood.
 From now on you'll use a roller to reduce your clay stack. (This tutorial will not work using a pasta machine!)
 Roll to 2x the original length, then cut in half and restack...
 ....always keeping to the original order of colors.
 Roll again until your "wood grain" is reasonably thin (no thinner than I'm showing or you'll lose the grain.
 Slice the stack in half again; use a pen to make an indention near one end. You might need to place a piece of saran wrap (cling wrap, kitchen plastic wrap, etc) on top in case your clay sections stick together.
 Remove the plastic wrap & the pen and place your cut-off roll into the indentation. Cover with the other half of your clay stack.
 Now as you can see by my photo, there are small air gaps on either side of the cut-off roll. You need to roll your clay stack again to remove the gaps.
 Slice your clay and voila!: faux wood.
Now that's really the end of the tutorial ...except I'm just going to mention a few ways to show water

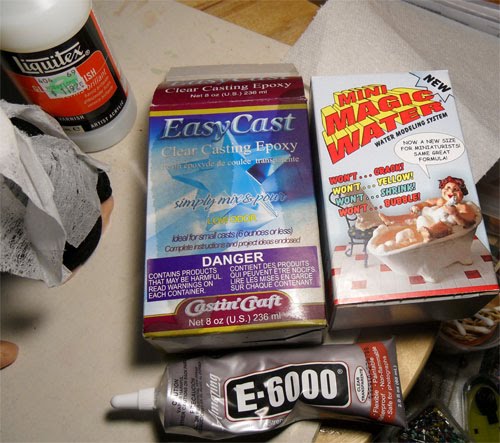
For the water that's in the tub, I used Magic Water, a 2 part resin that remains clear, does not yellow and best of all, once it's hard, it will not soften again. The disadvantage: it takes 24 hours to harden; it is extremely hard to use it to show running water because it just runs off.
The water in the tub is 1/2" deep. My apples all sank in the first tub that I made. With this resin, timing is critical! I was not impressed having to wait longer than 12 hours and having to make sure that the resin is thin enough to insert my apples but thick enough for them to stay afloat! I finally filled the tub in 3 stages and only added the apples during the last filling.
Easy Cast epoxy is also clear but it can stay/become sticky in warm weather. It's what I used to show the water around my fishing hut.
E-6000 is actually a glue that remains clear, flexible & is paintable. If you want to show a drop of dew hanging off a leaf, this is the glue to use!
My running water started off as a piece of clear plastic string (fishing line). Run the E-6000 along the string and position where you want it.
Along the left hand side of the photo is a bottle of Liquitex. Liquitex is the brand name of an artists acrylic Matte Super Heavy Gel that's non-yellowing, remains flexible and can be mixed with additives such as sand, sawdust or acrylic paint. If you use it, paint the surface underneath before applying. Disadvantage is it dries opaque. You can use it to show choppy water/waves as you apply it and it holds its shape.


 Posts
Posts