Let’s start with a one sided mold
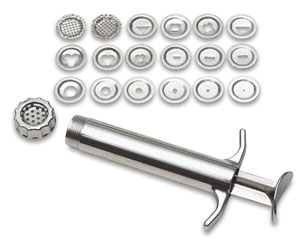
 Say you want to make lots of miniature clay cupcakes, I guess you could use a screen disc in your clay extruder to make the cupcake bottoms
  You could also make a simple mold using an electrical wire connector called a marette and some scrap clay that you may have laying around.
Here's my mold
 See what a nice shape my marette has made. You could also use is a bead. Unfortunately this mold has limited applications. For anything larger, you'd want a flexible mold.
Mold Maker by Sculpey allows you to create a flexible mold. Added to regular clay, it will give whatever you're making a bit of movement; it can also be used to soften old clay.
 But I want to make plaster castings for use in my castle roomboxes and these flex molds just don't cut it for me.
  See how part of my column broke off and was left inside the mold. I assume this was because at this end of the mold, the wall was too thin. But it might just as easily have been because the rounded edge of the pedestal base was too thin.
 This photo shows ...although it might not show up too well, how much of the detail in the original column didn't come across to the mold and hence to my copy.
 Here's another flex mold side by side with my clay copy. It was hard for me to avoid creating excess flash past the edges. In this case, it didn't matter too much as I was still in the process of designing my brackets....
 These two dragon brackets are meant to sit on either side of a doorway. I made them from scrap clay...that's why you're seeing two tone birds. The white-ish bits along the sides of the birds bodies are liquid clay that I used to bind the prebaked wings to the remainder of the brackets that were still unbaked. (You're seeing them just before they went into the oven)
 Can you imagine trying to make a flex mold that will show the folds in the wings
  or the tininess of the talons...
My next mold will be one made of rubber or more specifically, liquid latex. Because the brackets are meant to sit against a wall, their back can be flat, so I won't need to make a 2 sided mold.
Here's an article I pulled off the internet while doing my research. It was written in 2007 by someone named Judy. All the links back to her are broken so I'm hoping that I'm not infringing on her copyrights. I'm including it in this post because it offers the best written explanation that I could find that didn't also include specific brands of products:
What is a Mold? What is a Master Block?
Have you ever used cookie cutters with special little designs imprinted? You press the cutter down onto the dough and it leaves an exact opposite of the design you see in the cutter itself.
That's actually a mold.
A mold is something you can use over and over to replicate a design, shape, form. Think of the mold as the negative that forms your positive.
A master block is actually the permanent positive for your mold. From the master block, you can make numerous molds and from the mold, you can replicate numerous positives in the finished form.
Place your hand down onto rolled out dough and make a print. Your hand is the positive-the print in the dough is your negative.
If you happen to want numerous copies of an original, you will need a mold. From the mold, you can make 'repeats'.
If you also happen to need to know that you can make numerous molds, all exactly the same as the original mold, you will then need to freeze that design for all time, by making a master block of the original mold. In this way, you can continue to make the same exact mold, over and over for years.
Casing
Read books about any sort of mold making, and you're liable to run across the term 'casing'.
Casing, in some applications, would be called a 'mother mold'. A casing is an additional component to the master block, which actually provides you with an outer perimeter fencing. It is the part, which dictates and encloses the outside of your mold.
Where a mother mold is actually an outer rigid form, helping to hold a rubber mold in place - casing is the part of a master block, that forms the outside of a mold.
An example of a casing, would be a cake pan. In the event of a cake, you simply want a uniform outside shape. You're not interested in an interior design. The same happens, when you add a casing to your master block.
The master block forms the interior design, while your casing forms the outside shape and form.
Using a casing with your master block, gives you the freedom to simply mix and pour your mold material (plasters or rubbers) into the master, as the mold material is then completely restrained into a form. Like just pouring into a box. Without a casing, one has to continuously use the mold form in its place. While a mold form is a handy way to provide walls around your original mold, it's hardly time efficient when producing subsequent molds off your master. By taking the time to build a casing, each of your master's are self contained and ready for pouring, at all times.
Defining Different Types of Molds
When people think 'mold making', it's very possible they wind up in all the wrong categories because they were thinking one thing and the search engines are coming up with yet a whole other item.
When it comes to making molds, there is a wide variety of types and uses.
Rubber molds are also made out of a variety of different rubbers and formulas. Liquid latex is usually the easiest to find at a large craft supply store. Most of the other rubber compounds need to come from the manufacturer or online.
When trying to decide which rubber to use, check for flexibility and release. Flexibility becomes important when you may or may not be using a mother mold. A mother mold is sort of a rigid backup, to hold your rubber mold in place. Like a cradle. First, we look at the many types of materials one would use to make an object from a mold. Objects can be made from plasters (I say plural because of the many varieties of plaster and their uses), clay, resin and paper. Yup...paper. There are also different metals, one can use.
For the most part, folks are trying this out at home so we will look at those forms that can be done on the kitchen table (if need be).
Molds to form items out of plaster are made of rubber. Of course, you can make a plaster mold to turn out plasters but rubber is so much easier to live with.
Rubber molds are also made out of a variety of different rubbers and formulas. Liquid latex, a brush on compound, is usually the easiest to find at a large craft supply store. Most of the other rubber compounds needs to come from the manufacturer or online.
Liquid Latex Molds
Liquid latex molds are a 'build up' mold. It's created by layering coats of the rubber onto the object being copied. Enough layers and you have a sturdy mold.
A fresh supply of liquid latex should look off white and the consistency of pudding. When not using it, close the lid tightly. It's best if kept in a tight glass jar.
There is little need to apply any sort of separator to the model. If the model happens to be rough wood or very dry plaster, you might want to give it a very thin coat of vaseline.
For this practice, we'll take on a simple, flat sided object. The reason for choosing a flat backed object, is simply that it's so very simple to perform. Probably a good place to start, if you've never played with liquid latex or making molds of any kind.
You'll need a small working board. Something a little wider than your model and as smooth as possible. A piece of plastic window material, a tile, something like that. You will need a smooth paint brush. Get some acetone (hardware store or paint dept.) for cleaning your brushes. Some liquid latex. You will need some plaster to form a mother mold. If your object is only about the size of a biscuit, a cup of plaster will do.
Lay your model in the center of your working board and apply the first coat of latex. You start with a thin layer, let it dry then add another layer. The trick is to let each coating dry enough to actually be set (not sticky to the touch) but not dry enough to be tough, before applying the next coat. Usually, a thin coating is ready for another layer, in about 30 minutes. Never leave areas that are thicker than most of the layer you're working on. Don't let the layers sit over night, it's best to keep working the mold until you're finished. Using a hair dryer will speed things up. Then as the coats of latex build up, you might start applying a little thicker coat each time. Keep applying another coat, letting each layer dry, until it's built up to about 1/8" then let it dry overnight.
Before pulling the mold and model off the working board, you need a mother mold. The easiest way to mix plaster to its hardest form, in very small amounts, is to first pour your water (about 1/3 the volume you think you'll need). Begin slowly sifting in the plaster until it stands just above the surface of the water. You'll notice the plaster becomes saturated and then appears to crack on the surface. It's ready for mixing. You can simply mix (whip) with a spoon for about 3 minutes and then begin to spoon it onto the rubber mold. As it begins to set up, you can form it like icing on a cake, into a box like form, slightly wider both ways, than your mold. I'd say a width of about 1/2", wider all the way around, is sufficient. Before it's had time to become rigid, smooth the top of your mound to make it a flat surface, as this will be the bottom of your mold unit, when it comes time to pour materials into the mold for reproduction.
When the plaster is set up, twist the whole unit off the working board, turn it over and let it finish setting up until the plaster has completely cooled down.
With a sponge, wash back any plaster that has seeped around the edge of your rubber mold, preventing it from just dropping out. Grab the edges of your rubber mold with finger tips and gently pull the rubber mold out of the mother mold.
Once that is done, remove the rubber mold from your model. Now you can sponge down your mother mold and wash the rubber mold. Replace the rubber mold back into its mother mold for safe keeping.
When you’re ready to pour something like plaster into your mold, rinse your mold in soapy water and just shake off the excess. Then pour your plaster into the mold. The soap will rise quickly, bringing with it any bubbles formed in the plaster.
The soapy solution should be about the same as a pan of dish water. No more soap than that.
For simple objects, you can use plaster of paris, mixed very densely. Just a note of caution: liquid latex is not suitable for pouring resins.
As for mold release compound for plaster, you can buy mold release or even make your own. To make your own, mix about 1/4 dish washing soap to 3/4 water. Brush on with a soft paint brush. Let dry. Polish with a smooth, soft, dry towel. Reapply, dry, polish. It's best to build up 2 or 3 layers until you get a sheen.
The soap must be completely dry, before applying plaster to plaster.


 Posts
Posts